Five Principles of Process Documentation (Plus Two Bonuses)
May 3, 2025
documentation Microsoft Word process development
I got my start with process documentation way back in my hotel days circa 2012. This was a relatively minor project—we needed to do some updates to our daily checklists—but I was asked to help because I knew the most about Microsoft Word. (Read as, I knew how to use custom bullets so that we could format the document as a checklist.)
Since then, I’ve written hundreds—maybe thousands—of pages of documentation for various jobs. This often involves either developing or improving the process we’re documenting as I document it. So, here I’d like to share five core principles I use to do process documentation, plus two bonus principles that take it to the next level.
1) Write Notes as You Go
Look, I get it. Everyone’s busy. You tell yourself that you’ll figure it out first and then document later.
You won’t. This is how so many businesses end up with complicated processes that live entirely in key employees’ heads. And I’m not throwing stones—I learned this one the hard way by being that employee.
The problem is, if you don’t write it down as you go, you’re going to forget what you did. You’re also going to add a lot of extra work to the end of the process, which makes it less likely that it will get documented at all.
The caveat is that you often end up changing a process as you go, and you don’t want to waste too much time writing in the development stage, only to have to throw most of it out.
I’ve found the best solution is to take notes as an outline as I go. This makes it easy to throw notes in and to revise on the fly. At the end of the process, these notes will form my outline for writing full documentation. Let’s look at an example. If I were developing a process for identifying and merging duplicate vendors, my notes might look like this:
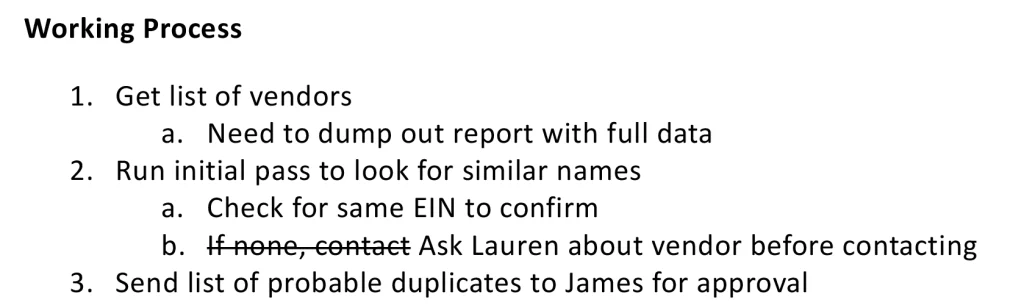
This is a quick outline—easy to do as I work. I have supplemental note, but at this stage, they’re meant to be reminders for me, not explanations that will make sense to others. I also often use strikethrough if I’ve written down a step but then find out that it needs to be revised. This can be useful since sometimes a revised note captures potential pitfalls or mistakes that others should be warned about.
2) You Can’t Be the Cornerstone
Documenting a process often involves building tools that help make that process easier or less prone to errors. However, you need to ask yourself, “Would this work if someone else was doing it?”
This is a balancing act between saving time and making things difficult to maintain, and there aren’t any hard and fast rules. That said, I like to think about how things could break, who could fix them, and how you can manage the risk.
For example, I build complex spreadsheets with protection to reduce the odds of people breaking or overwriting formulas. I also use data validation, including input messages, to help the user enter data correctly. In an environment with SharePoint, I can also assume that IT could roll a file back to the last working version if necessary.
I also think carefully about when it makes sense to use coding. For example, I can write VBA, Python, and SQL, but I can’t assume the next person in my job will have the same skills.
In some cases, that’s fine. For example, in Yardi, you can build a SQL-based report that can be run by users with no coding knowledge and no way to break the source code. As long as the underlying database structure stays the same, the report will work without further intervention. However, I shy away from building tools that require the user to run VBA or Python scripts. Those have a higher risk of breaking, and the end user probably won’t know how to fix it. I may use those to speed up my personal workflow, but I don’t use them when I build tools for others.
3) Give the Right Amount of Detail
Whenever you write process documentation, you need to think about how much detail your audience needs. Too much will make your documentation unwieldy and hard to use, but too little will leave gaps that may confuse the user.
How tech savvy is the audience for this? What skills can you already assume they have?
For example, if I’m writing documentation that will only be used by accountants, I assume they know how to use our accounting software. For instance, my documentation might look like this:
- Run Aging Receivables with following settings: [Image of the report settings]
Whereas the same instruction would look like this if it’s intended for a non-accountant:
- Go to Reports in the left sidebar [Image of where to find Reports]
- Click on Aging Receivables [Image of the dropdown Reports menu with the line highlighted]
- Enter the following settings [Image of the report settings]
- Click Run [Image of the report with the “Run” button highlighted]
In general, the wider the audience, the more detail you need to provide.
4) Use Graphics
Visual aids are essential for good documentation, particularly when dealing with a complicated system.
You may not always have access to Photoshop, but you can make perfectly good graphics in Paint. For example:
- Under Orientation, choose Landscape:
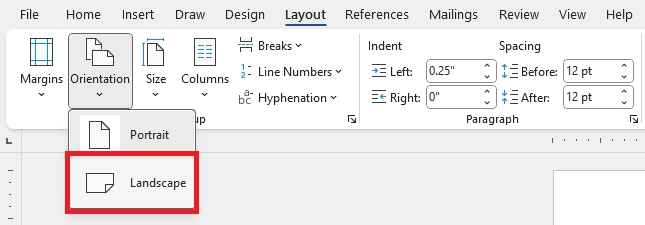
This was fast and easy to make—I just threw a screenshot in Paint and added a box. (Note: You should generally have text instructions as well as images. This is important for accessibility.)
For a more complicated example, you might need to have the user fill in multiple fields. The instruction might be something like this:
- Under Settings, choose the following options:
- For Allow, choose “Date”
- For Data, choose “between”
- For Start date, choose a date far in the past (such as 01/01/2000)
- For End date, choose a date far in the future (such as 12/31/2100)
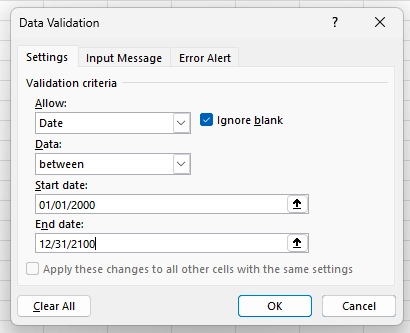
In this case, every field is important, so you don’t even need to highlight any of them. You can just include a description and an image without further markup.
5) Don’t Leave the Last Step for ‘Later’
Once you’ve worked out and refined a new process, the last step is fully writing out your documentation. This is the step where you flesh out your outline into full process documentation (as well as adding graphics and other materials).
At this stage, the process development is done, so it’s tempting to close the project and move on to the next thing. After all, you probably have several more projects that need immediate attention. You can document it later when you’re less busy, right?
This is a trap. If you don’t write down your documentation as part of the project, you probably never will. In my experience, you’re much more likely to get the extra time to properly close out an existing project than to get the time to go back and document an old one. Besides, once documentation is written, it’s faster to revise in the future. These five points are the core principles I use to write process documentation. But keep reading for two more bonus points that take very little time but massively improve the quality of your work.
Bonus 1) Use Styles
Microsoft Word’s Styles feature is extremely useful and quite underutilized. It allows you to quickly set up a style set for your documents, which makes it much faster to give your documentation a consistent look.
As an example, a simple setup might look like this:

It doesn’t take long to set up, but it will make it easy to add headers, style images, and format lists without having to fiddle with the style every time. I’ll talk about how to create a style set in a future article.
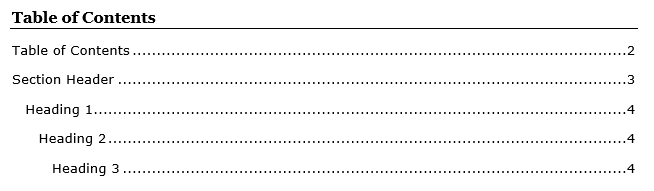
Bonus 2) Cross-References are King
Good documentation is long—you need a lot of steps to explain things clearly and the images pad things out even more. Unfortunately, this can make thorough documentation hard to use. You can get around this with a table of contents and a good cross-referencing system.
Word has a built-in table of contents feature. If you’ve used headers, Word can generate a table of contents automatically, and will keep the page numbers updated for you. (This is another benefit of the Styles feature; it encourages you to use headings instead of just styling normal text.) A simple table of contents might look like this:
In addition, you should use cross-references to help the user navigate your documentation. A cross-reference refers to another location within a document. For example, it might be something like this:

In this text, both “Identifying Duplicates” and “Page 3” are cross-references (the first is a reference to the text of a header and the second is a reference to the page where that section starts). Word’s Cross-reference feature lets you insert these and keep them automatically updated. As a bonus, if you export your documentation to PDF, the cross-references will become hyperlinks.
I’ll also go over how to do tables of contents and cross-references in a future article.
Conclusion
These points are the product of many years of experience writing process documentation—and making plenty of mistakes along the way.
If I leave you with just one point, though—any process documentation is better than no process documentation. Start with that, and you’ll be in better shape in the future.
Posted In: Articles, Best Practices
Comments
0 responses on “Five Principles of Process Documentation (Plus Two Bonuses)”